Back to Work

6 11 2012

Well, after a wonderful spring and summer in the Blue Ridge Mountains, it’s time to get back in touch with reality. I have lots of new things to share with you and hope you will be as excited as I am about some new things that I am doing and offering as products.

First, in the quilting department, I am offering some new classes. Artsy Fartsy is a new class that will be offered in installments…thread art, thread painting, embellishment, quilt as you go are just a few topics included in the series.

In the dog accessories department I will be offering a custom collar and bandana combination. The collars will be in specific color combinations to enhance the colors found in the matching bandanas, which of course, can be personalized to your specifications.

Finally, I have two new products in the monogramming department. First, an adorable alternative to personalized binkie blankets: precious stuffed animals with the little ones’ birth information and name on its tummy. Animals available include lambs, monkeys, elephants, ladybugs, etc. The second product is a very fashion forward monogrammed fold-able tote…leopard, cheetah and other trims are available with this item.

Please stay tuned…I promise to do a much better job of keeping in touch!


March Madness: Better Late than Never

20 03 2012

With Spring Break and tons of company, the best laid plans can go awry. I had every intention of getting this information out in a timely fashion, but, alas, life got in the way!.

That being said, my March Madness sale will begin on WED., MARCH 21. It will continue through midnight FRI., MARCH 23. The images below are items that I can order for you and personalize. I WILL PERSONALIZE THESE ITEMS FOR 10% OFF. The cost of the item cannot be discounted but I can purchase them at VERY reasonable prices that will passed along to you. If you are interested in purchase, please email me at chiliquiltes@gmail.com

This slideshow requires JavaScript.


Oops! Friday Got Away From Me! Longarm Tip #3

4 03 2012

Friday was way too busy and I didn’t have an opportunity to post…in fact all of last week is a blur! Nevertheless, here is Longarm Tip #3:

Would you like to use prewound bobbins but feel that they are too expensive to use on a regular basis? Here is my argument for using them: they really do have more thread on them and the time saved by not having to change bobbins or even to prepare them is worth it. That being said, I have also found some great sources for prewound bobbins.

Ken’s Sewing Center has a great selection and be sure to check out their store brands of threads. The threads, both the quilting, embroidery and bobbins are awesome and they are very reasonably priced.

APQS has a very reasonably priced prewound bobbin. I have been using these for the past two years and have found them to be well worth the money.

Metro Embroidery also has some great deals…you can keep an eye on their specials and their regular threads are always a bargain.

Hope you have a great week!


Friday Longarm Quilting Tip #2:Squaring The Backing

24 02 2012

This week’s tip is dealing with squaring the backing of the quilt. We all know about squaring the quilt top and how important it is but how do you do the back. You MUST have the top straight as that is how you will attach the backing and if it isn’t straight as it pulls inward you will end up with pleats and a general mess.
If you find that the back has to be pieced, square the two pieces and then sew the seam horizontally. This will give you a great way to see if you are keeping the back straight as you load it as well as keeping the seam tight (iron the seam flat open, by the way). Next fold the back in half and lay it over one of your frame bars lengthwise…be sure the the fold is in the middle and check to see if it lays flat when the edges are together. If they don’t match up, use your rotary cutter, ruler and mat to make the edges even. Now fold the backing along the width of the piece. Follow the same procedure. This should square the backing so that you will be ready to load it.


Artsy Fartsy Class at Quilting with Machines

18 02 2012

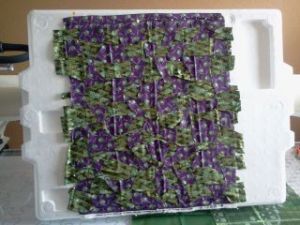
One of the techniques that I will be teaching in my class in Sept. is how to make a soft background fabric for an art quilt. I have woven straight strips before, but wanted to try the wavy strips in some practice fabric before I did “the real thing”. I do like how it looks…it gives the fabric so much movement.

Woven irregular strips of fabric

Background Fabric Weaving


And again it is Friday and I am Keeping My Promise!

17 02 2012

Again it is Friday and I am thankful for another awesome week! I have been extremely busy but that, praise God, is a good thing! I have two logos that I am working on for clients and I had the pleasure of meeting a great group of people in my Business Blogging Class on Wednesday evening.

As promised, I am going to pass along a couple of tip that I usually give in my beginning longarm quilting class.  Many quilters have problems with keeping the sides of their quilts straight from top to bottom. Although basting along the side of the quilt at each advance does help, here are two ways that you might be able to alleviate the problem:

  • Most quilting frames come with wimpy little clips for the sides of the quilt. Although there are expensive wide clips that you can purchase, here is a tip on how to make your own from “the queen of cheap”, me! First, go to your local home improvement store and pick up two of their FREE paint sticks for stirring cans of paint. These sticks are about 12″ long and about 1.5″ wide. Next, cut two 12″ squares of muslin and create sleeve that is the width of the paint stick along one side of each piece of muslin. Insert the paint stick. After loading your quilt, pin the non-sleeve side of the muslin to each side of the quilt. Attach the wimpy clips to the paint stick side of the muslin. You now will have even tension for at least 12″ of the quilt helping to keep it straight as you move down the quilt. NOTE: You will need to remove the side pieces before you advance the quilt and then pin them back on before you begin your next section of quilting.
  • Keep a tape measure draped around your neck and check your width after each advance. Sounds like a pain, right? Believe me, it will pay off if you can fix a problem before you get to the bottom of the quilt.

Well, that’s it for today. Tune in next Friday for another longarm quilting tip.


Ch-Ch-Changes Part 2

13 02 2012

Today I would like to tell you about the changes that are occurring in my  business, ChiliQuiltes. As of the January, my focus has changed and I hope you will share with me the excitement that I feel as I venture out into new territory.

First, ChiliQuiltes, my first business venture, will be the overall umbrella for two other smaller ventures. First, I would like to introduce TAKE IT PERSONALLY, a custom embroidery business that will be a joint partnership with my husband. We will be doing custom embroidery ( for shirts, wedding accessories,baby items, hats, towels, graduation and other special event or holiday gifts, etc.) both locally and online.

Secondly, I would like to reintroduce you to my other smaller venture,NECKS 2 NOTHING. Necks2Nothing is a pet accessory business which includes unique dog bandanas (personalized), as well as personalized leads, collars, T-Shirts with your dog’s picture and personalized with embroidery, as well personalized crate covers  and beds.

What about ChiliQuiltes? What’s up with this part of the business? Well, I will be doing my teaching under this name. I will continue to teach my business blogging,  Designs within the Lines (certified through Pam Clark), and a brand new class, Artsy Fartsy, which is an introduction at art quilting and surface design techniques.  I also hope to begin giving tips for beginning longarm quilters to help them as they begin their love affair with machine quilting. BTW, I will be teaching at Quilting With Machines again this year. The two class that I will be presenting are Artsy Fartsy and Business Blogging.

In the upcoming days, I will be adding a cart and paypal capabilities to this site with further information about products and policies. In the mean time, if you have questions, please contact me at chiliquiltes@gmail.com.

Again, I hope you will join me and be a part of my new adventures. I would love to become a customer but just having your support will be a thrill, believe me! Happy Monday!


Update on Binkie Fabric

8 11 2011

I was able to buy some amazing binkie fabric at the Houston Market from Shannon Fabrics which is a wholesale provider. It is so unbelievably soft and cuddly.. people kept stopping at the craft show to “pet it”. Any one who has a new baby or toddler will want to get one!


International Quilt Market, Houston, Texas

30 10 2011

Today is my third day at Market. I have a FABULOUS time trying new techniques (I took two classes; one on surface design and the other on additional ways to use rubbing plates from Cedar Canyon (with foils, gel pads, etc). SOOOO awesome! I also attended the schoolhouse sessions on Friday and the sample spree. My brain is on explosion mode with all the information and ideas I have gathered and I still get to have another day here!

Tomorrow, I am looking forward to teaching my business blogging class. I hope that all the participants are going to receive information that will help them make the jump into the blogging world less scary and less intimidating.


Quilting with Machines

5 10 2011

Checked into the conference today and had some time to see the vendors and look at the quilts..OMG! Beautiful quilts and lots of cool things for sale.